Changing snare wires from time to time is part of what keeps a snare drum sounding great. Wires can bend, break, get stretched out, or just lose some of the vibrance they once had. Changing wires can also be a good way to switch up your snare sound. Maybe you’re happy with the drum’s heads, but something about the wires bothers you. No matter why you’re changing your wires, we’re here to help you with the process.
This step-by-step guide should help people who have never installed snare wires before, but it could also benefit longtime drummers who might not be very confident with their current method. We’ll try to make it easy enough for anyone to follow, while throwing in some tips that might help more experienced drummers. In the end, you should have your snare wires properly installed, on a snare drum that sounds and performs up to its maximum potential.
*This post includes affiliate product links, through which we may receive a small commission. We take pride in only recommending the products that will help drummers most. Thank you for the support!
What type of wires?
If you haven’t purchased new wires yet, there are a few basics to know.
Straps or Cord: Most modern snare drums can use either plastic straps or cord to hold wires in place. When you buy wires, they’ll come packaged with one or both options. You might think plastic is more prone to breaking, but that’s usually not the case. The type of film used is similar to that of a drumhead – very strong and durable. Straps will almost always last longer than the actual wires themselves.
Straps are easier to install, too. It’s the method we’ll show you below. That being said, a few older snare drum models require cord. It can be difficult to properly install wires that way, so hopefully your drum is the more common type that gives you the choice.
Size: Of course, you’ll want to know which wire size to buy. Snare wire lengths are referred to by the diameter of the drum they’re going on. The actual length of the wires will almost always be less than the diameter of the drum. Just measure your drum’s shell, not including the metal hoops. If the drum has a 14″ diameter, you’ll need snare wires that are labeled as 14”.
Type: There are many types of wires available. Some use higher quality metals, have more wire strands, use different attachments, or have very specific sounds. The most popular and versatile type is 20-strand steel, which works for almost everybody.
Our budget recommendation is Gibraltar, like the Gibraltar 14″/20-strand SC-4467 model. The Puresound Custom 14″/20-strand Steel are professional quality and only cost a little more, but they ship with cord for installation. If you want to use Puresound Customs, but make installation a little easier, you may want to buy separate straps. The Gibraltar SC-NSC is an affordable option.
With the wires in hand, you’re ready to install! Here’s how to change snare wires.
1. Remove the Old Wires
Removing the old wires will usually require either a screwdriver or a drum key. If you’re using a screwdriver, be careful not to strip a screw head. Many old snare drums use small screws, so try not to use a screwdriver that’s too big.
Just give the bolts or screws (usually 2 on each side) a few 1/2 turns. That will usually be enough to loosen the screws enough to slide out the snare straps or cord. If the drum uses cord, you may need to untie some knots.
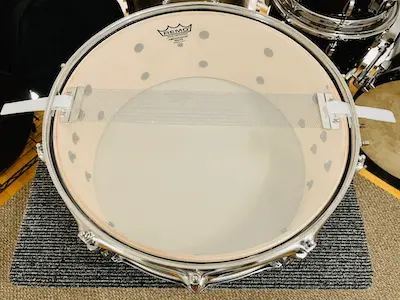
After loosening the screws and removing the wires, the bottom of the drum should look like this:
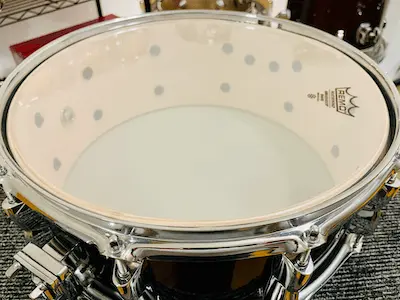
Take this opportunity to also inspect your bottom snare head. Does it have any holes or large dents? Take a look at how stretched out the head is. You can do this by comparing the head level to the level of the bottom metal drum hoop. The head should sit a little lower than the hoop. If any of those things don’t check out, it might be a good idea to change the bottom snare head before you install new wires. You can use our guide here if you need some help.
If you need a new snare side head, the two most popular options are the Remo Hazy Ambassador and the Evans Snare Side 300. Like wires, just be sure to get the right size for your drum.
2. Prepare the Strainer
Before we work with the new wires, flip the drum right side up. You’ll want to make sure the tension adjustment is properly set on the snare strainer. Why? Every strainer has a range of how much it can be tightened or loosened. Our goal is to attach the strap to a strainer that’s set towards the middle of that range. That way, when you’re all done, you’ll be able to get a very loose snare sound, a very tight snare sound, and any sound in between.
Keep in mind that there are many strainer types. Our pictures show a very common strainer design, but yours might be different. The general principles will still apply, however, to almost every type of strainer.
So how do we find that middle zone? The best way is usually to tighten it all the way first. Make sure the strainer is engaged (usually a lever being up), then turn the strainer knob clockwise until it’s tight. Then, loosen 10-12 quarter turns. For most strainers, that’s somewhere near the middle of the range.
You might ask, why not loosen the strainer all the way to find out where the bottom of the range is? Well, many strainers will actually come apart if they’re loosened too much. They can be reassembled, but it’s usually a nuisance to do that.
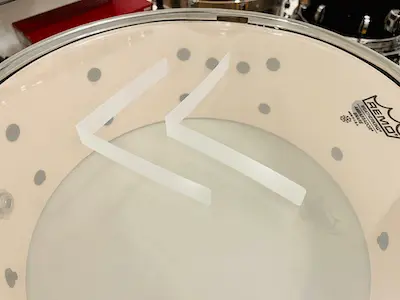
3. Fold the Straps
With the wires removed and the strainer set towards the middle of its range, we’re onto the simplest step of the process. Flip the drum back over, so the underside is facing up. We’ll be working on this side from here on out.
Fold the straps in half, like the image shows. This just makes it easier to work with the straps in upcoming steps.
4. Center the Wires
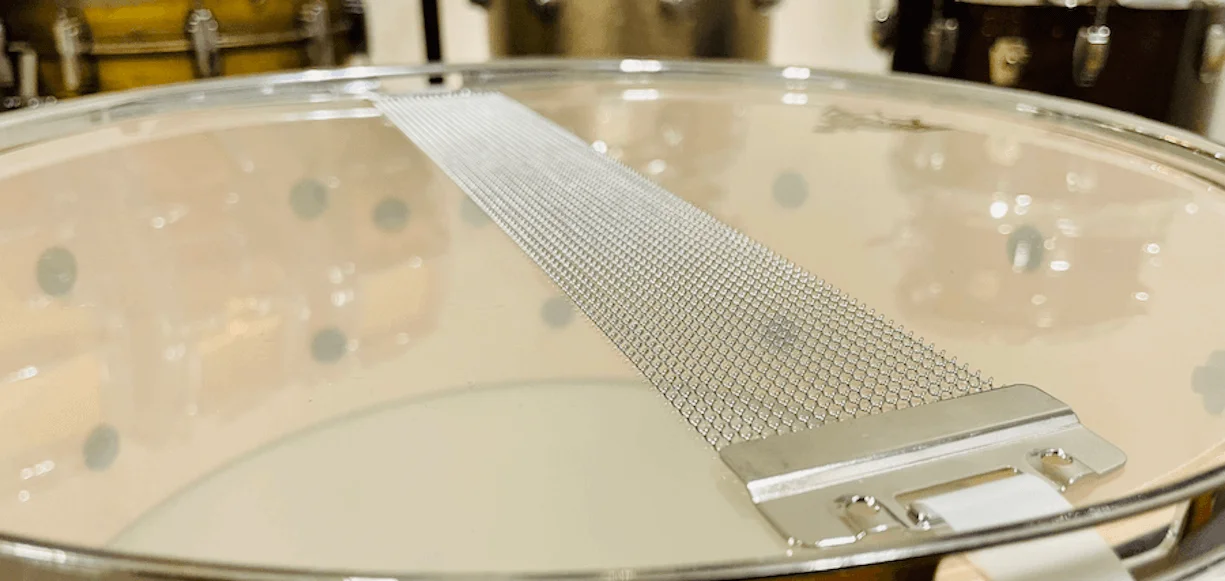
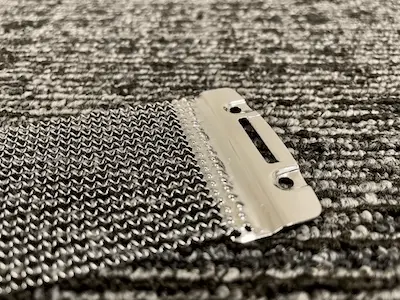
Before we lay the wires on the drum, take a look at the end plates. There’s a top side and a bottom side to snare wires. The bottom side is what you’ll want contacting the drumhead. You can identify that bottom side by the soldering that connects the wires to the ends plates.
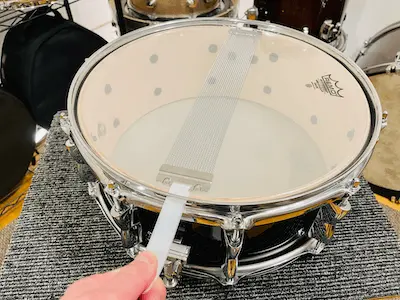
Slide the folded straps into the snare wire ends and lay the wires on the head, bottom side down. Slide the strap ends through the slots in the bottom drum hoop. Finally, center the wires, so the ends are equidistant from the drum edges. It should look something like this:
5. Attach the Butt End
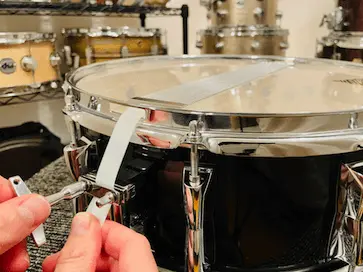
We’ll attach the butt end first. That’s the side opposite of the snare tension adjustment. Slide the strap through the butt plate clamp on the drum. Then, you’ll need a little hand technique. Before tightening the plate clamp down, it’s important to make sure the strap is taut.
Double-check to see that the snare wires are centered on the drum. Then, hold down the wire’s end plate with your thumb, and use your index finger to hold the strap tight against the drum hoop, pushing through the drum butt plate. This is what that technique looks like:
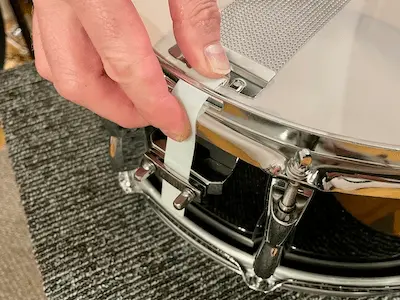
What you’re trying to avoid is slack in the plastic strap. When you feel it’s solid, tighten down the butt plate with your drum key or screwdriver with your other hand. You don’t have to crank down too much, but make sure it’s firm.
Before moving on, gently pull on the other strap (opposite the side you just worked on) to make sure the wires will be centered when there’s some tension on the wires.
They don’t have to be precise to the millimeter, but they should be very close and not overlap the drum shell. If the wires shifted off-center, redo this step.
6. Attach the Strainer Side
With the butt end attached and the strainer adjustment set, you’re ready to attach the second side. This step is similar to step 5, but things are a little easier now, since you don’t have to hold the wires down. You already attached the butt side, so the wires won’t be able to shift off-center.
With the strap through the hoop slot, pull it through the strainer’s clamp. Keep pulling on the strap with one hand while you tighten the strainer bolts with your drum key or screwdriver. Just like the butt side, try not to over-tighten, but make sure it’s firm.
7. Check Your Work
Finally, you’ll want to check how you did. Make sure the wires are basically centered on the drum after both sides are attached. Neither end should be butting up against the drum shell’s edge. If the wires looks centered, flip the drum over and hit the batter head.
There’s a good chance the wires will sound a little loose at first, but that’s fine if you set up the strainer properly in step 2. If the wires sound sloppy, tighten the strainer knob a 1/4 turn and try again. Keep dialing it up slowly until the snare sounds good. You shouldn’t have to tighten more than a couple of complete turns during that process.
How tight should the wires be? That partly depends on personal preference, but a very common mistake drummers make is over-tightening their wires. Usually, they’re trying to keep the wires from vibrating when they hit other drums. That can work to a small extent, but it can also make your snare drum sound bad.
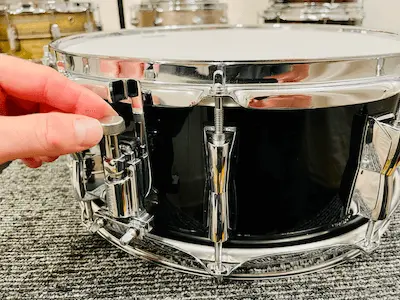
Our advice is to physically check the amount of play the wires have. With the snare strainer engaged, grab an end plate of the wires with two fingers and try to wobble it back and forth.

There should be a small amount of wiggle room with moderate effort, maybe an 1/8″ or so. If the wires feel locked in place, they’re probably too tight. The snare wires won’t be able to vibrate like they’re designed to. If the wires are set properly and the drum still sounds bad, then the issue may be due to bad heads or tuning.
Wrap-Up
That’s all there is to it! Hopefully we helped you learn how to change snare wires on your drum and maybe a few things about snare drum mechanics along the way. Drum maintenance isn’t rocket science, but there are some tricky aspects to it, especially if you’re new to drumming. Like anything else, the more you practice, the easier it’ll get!
By Peter Treuden – About the Author
If you’re interested in the drum we worked on in the pictures, it’s a 14×5.5 Yamaha Stage Custom Birch. It’s one of our picks for Best Values: Snare Drums, where you can find out more about it.
Very helpful. Thanks!!!